- Home

- Blog
- IP Video Surveillance
- Peter's top 5 tips to make your Wi-Fi camera work

Peter's top 5 tips to make your Wi-Fi camera work
Normally, users can use the App to set the camera's WiFi, then can instantly access the camera. However, the camera might fail to connect with the router , people would stop trying to use it because they felt frustrated. As Yoosee cameras are very popular, we receive many technical support requests from our clients everyday, the camera failed to join the network during the initial setup is one of top 10 problems.
1. Reset Camera During the Initial Setup
Peter is the technician in Unifore, he concluded that most of users failed to setup the camera, simply because they didn't reset the camera during the initial setup. By the way, the Wi-Fi cameras only support 2.4GHz WiFi band, if you have the Dual band router, make sure the camera connects to the 2.4GHz WiFi SSID, because it doesn't support 5GHz WiFi band.
2. Try wired connection if Wi-Fi setup fails
If the camera fails to join the WiFi network, users can try the wired Ethernet connection. Simply running the Ethernet cable between the camera and the router. Once the camera is accessible, you can switch wired network to Wi-Fi by operating the App.
3. Enable DHCP and Disable MAC filter
Moreover, make sure DHCP is enabled on your router, otherwise the camera can not get IP address automatically and then join the LAN. Your router's settings will block the users to access the camera. For example, users should disable MAC filter function otherwise the camera will not be able to connect to the LAN.
4. Open ports if the router has firewall rules
For school and office routers, they usually have firewall rules to block certain network ports. Hence the network admin needs to login router's web admin page to open the ports. UDP ports (51700, 51880, 51881), TCP port (8787) should be opened if users want to use Yoosee/CoT Pro WiFi cameras.
5. Cameras should be within WiFi coverage
Mounting or placing the camera within the WiFi signal coverage is critical when people use or install wireless / WiFi cameras. Herein we share some tips to help you find a spot with good Wi-Fi signal in your house. As we know, the Wi-Fi signal has the limited coverage, depending on your router, the WiFi signal only can reach max. 10-30 meters in the house, if you install the camera at a blind spot, you either cannot access the camera or have unhappy experience on watching live video.
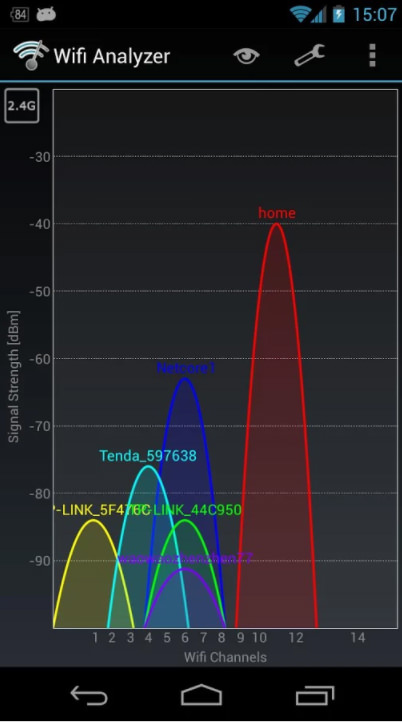
Technically speaking, make sure a -70dBM Wi-Fi signal strength for your camera. So here is the question, how to know the WiFi signal strengh?
You don't need to use a special tool to check or measure the WiFi strengh, you can use your smartphone with installed free WiFi signal analysis tool app to do this. There are a plenty of apps can detect blind spots, scan and view the WiFi signal strength. For Android phones, we recommend the WiFi Analyzer, it's a perfect app not only show the signal strength of your WiFi network, but also can give information about the strengh and operating channel of other networks in the area.
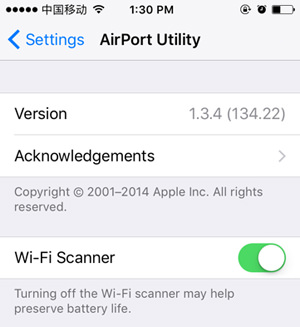
For iOS, Apple offers its own app for scanni g and viewing the WiFi network in the area, as well as the channel spread for possible interference. You just need to download Airport Utility to your phone, go into the global settings pan for the app, and turn on the WiFi scanner.
Certainly, there are many software/tools available for Windows computers for scanning and anaylyzing WiFi. E.g. you can install NetStumbler, Wi-Fi inspector, inSSIDer etc. Some of them are free and some cost monthly fee.
Get My Latest Posts
Subscribe to get the latest updates.
Your email address will never be shared with any 3rd parties.
Popular Tags

Scan me
