Do you still use analog cameras? Today, Analog HD cameras are very cost-effective, no matter they are AHD, HDCVI, HDTVI cameras from different manufacturers, in this article, we are pleased to share a tutorial that guides you to install analog HD cameras. This tutorial originally come from user manual content of Qsee cameras. Please keep in mind that AHD cameras only work with AHD DVR, likewise, HDCVI cameras work with HDCVI DVR and HDTVI cameras work with HD-TVI DVR. All these analog HD products based on different technology can't be compatible each other. If you are upgrading from a standard Analog system, you will be able to use the existing BNC power/video cable but you must to replace both the recorder and the cameras with Analog HD technology equipment.
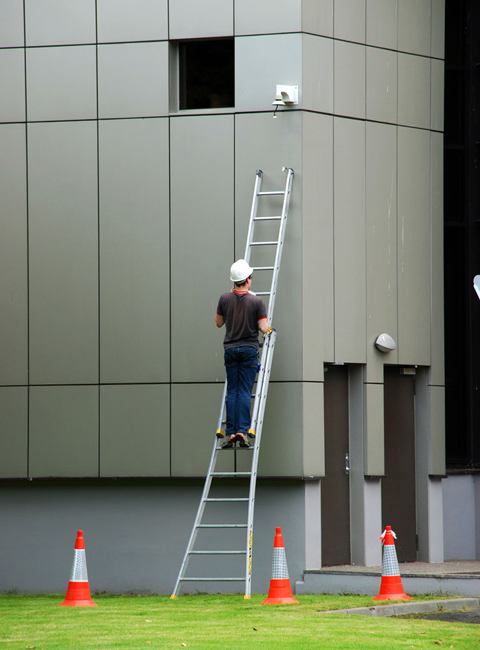
Where is the right place for camera installation?
Don't be in a hurry to install the camera. Conducting a survey to check where the camera should be installed. Before installing your cameras, it's very important to select a proper installation site not only for good field of view, but also for other considerations.
When analog video signal transmits over coaxial cable, the further the camera is from the DVR or monitor, the higher the chances of signal degradation. Typically, shielded Siamese coaxial cable (RG59) provides greater distances compared with regular 75Ohm coaxial cable provides acceptable signal at distances up to 60 metre (200'). Furthermore, the camera's power supply should be located as near to the camera as possible when the distance exceeds 200' as the power level will drop over extended distances resulting in a decrease in video quality.
Since electrical interference will degrade the quality of video signal. The camera should not be installed in places near high voltage wires or other sources of electrical interference. To prevent damage and vandalism, the camera should be installed more than 2.5 metre out of reach height.
Although outdoor camera can withstand extreme weather conditions, you should not place the camera where rain or snow will hit the lens directly nor should the camera be placed so that the sun or strong light shines directly into the lens. Your camera is weatherproof, but don't submerge it in water. Ensure that all power and video connections are not directly exposed to water and are protected from the elements.
Window will cause a reflection that will obscure events. Likewise, the camera's infrared illuminators will reflect off the glass and shine into the lens, thus degrading the image. So, do not place camera behind a window.
Connecting cameras to DVR and power supply
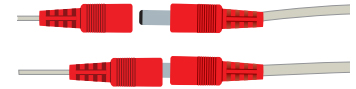
Step 1: connect the BNC and power leads from the camera to the matching connectors on one end of the power and video cable. When connecting the power and video cable between the camera and the DVR, the "male" power end (red plug) connects to the matching power lead on the camera.
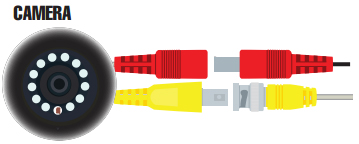
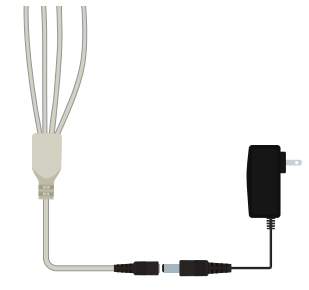
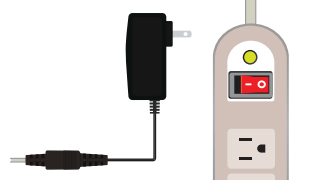
Step 2: For multi-camera packs, connect the power connector on the other end of the cable to the power splitter. For single camera, connect the power lead into the power adapter itself. In this case, you can skip to step 4.
Step 3: Plug the power splitter cable into the camera power adapter. Do not plug the adapter into an outlet at this time.
If you use multiple cameras, the included power adapter is designed to provide enough voltage to operate multiple cameras. Connecting a single camera to the adapter can cause the damage of that camera.
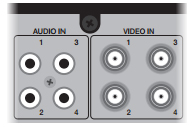
Step 4: Connect the BNC connector on the other end of the power and video cable to a Video in port on the back of DVR.
Step 5: Plug the power adapter into a surge protector. When selecting a surge protector, it's highly recommended to use one that is UL-1449 rated, for a clamping voltage of 330 or lower, a joule rating of at least 400 and a response time of 10 nanoseconds or less.
Troubleshooting of camera's installation
Lines in the video images
Check the cable. If you connect a camera that is working to the cable of the camera that has the lines and it too shows lines, replace the cable. If you are in an area with a lot of electrical interference, switch to a shielded cable such as RG-59.
No video from camera
Check all connections and make sure that camera is connected to proper power supply. Check to see that the camera is receiving power by cupping hand over lens. You should see a faint red glow from the LEDs. Check camera on known functioning cable to determine if issue lies with camera or cable.
To check to see if the camera is receiving power, cover the light sensor with your finger. This causes the camera to activate night vision. If the camera is receiving power, the night vision LED's in the camera will glow red, and you may hear a clicking sound in some cameras that have an Auto Mechanical IR Cut Filter.
Dark video image
Some cameras feature an infrared cut filter to improve daytime video images. This can sometimes become stuck. Place a hand over the lens for 10 seconds to trigger night vision mode. You may hear a soft click as the filter resets.
Upside down video image
Change the orientation or position of your camera to correct. Or, use the video flip option in your DVR’s Camera Settings menu.
Sun induced burn out
Direct sunlight entering your camera's lens will cause awful video degradation includes blurriness, changes in contrast, and eventually complete blackout. These don’t always need to come right from the sun. Highly reflective surfaces are just as detrimental. Wide Dynamic Range (WDR) is not a solution and will not save your camera.
Video disturbances, ghosting, or colored lines appearing
If your power distribution box or power adapter is improperly grounded, your cameras will have all sorts of video disturbances, ghosting, or colored lines appearing. Simply using another different power source with another electrical circuit can help rule out this problem. We have seen cases where electrical circuits in the whole house were improperly done by the electrician, resulting in no resolution of the issue.
Get My Latest Posts
Subscribe to get the latest updates.
Your email address will never be shared with any 3rd party.